Spud says...
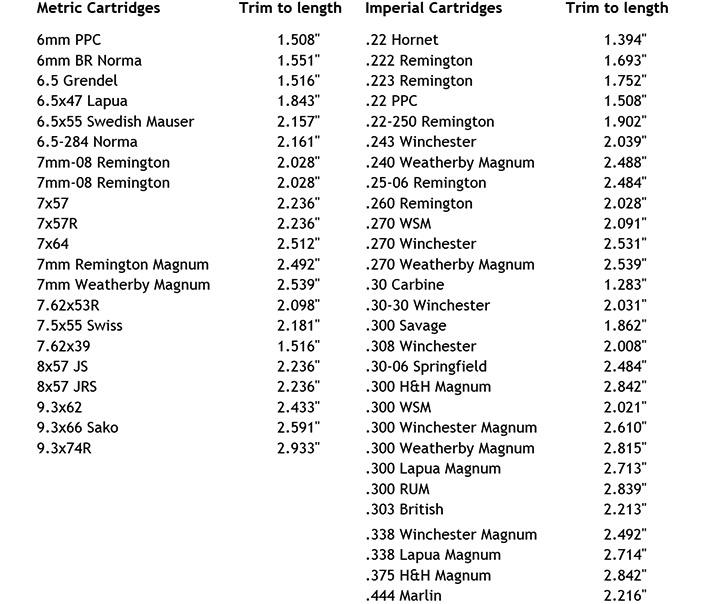
The chart below is the SAAMI-approved trim list for specific calibres. Another helpful way for custom chambers and wildcatted rounds is to trim to the shortest length. This means randomly taking 10 of your cases, measuring each, and cutting all of your brass to the shortest length. This is a nice, easy tweak to increase your home loads' accuracy.
Scroll further down for more help and hints.
Once you have shot your brass a few times, in most calibres with standard shoulders, the brass case will increase in length due to brass flowing forwards due to the firing procedure of the round. Some calibres, such as the Ackley Improved variants that have 40° shoulders, don’t tend to lengthen too much or as often, so trimming them isn’t such an issue.
In the standard calibres, we have to trim because, as the case gets longer with the brass flowing forward, the patient will take too long to the chamber in the rifle. So, we cut the case back to a set distance to give us clearance in the room. The length we trim back to is called the ‘trim length’. Brass case manufacturers like Lapua, Norma and Nosler all produce recommended trim lengths on their websites for specific calibres. We can also trim to the shortest case in a batch. The way we go about this is to measure a selection of brass in our collection (at least 10) and, find the shortest case, then trim the rest to that length. This is also an excellent time to conduct a case inspection, looking for defects such as splits, dents or anomalies. All trimmers trim the neck end of the case.
No set rule on how often cases should be trimmed to length. Some calibres will need trimming more frequently than others. If you are using a ‘pokey’ load, and by that I mean a bag near the top end of the pressure range, brass tends to flow more, so the cases will need trimming sooner. One issue to be aware of when continually cutting brass is that the brass in the web section of the case (where the case head thins into the body) can become too thin and cause the body to separate from the case head; this can happen after many firings and trims. This is called ‘head separation’. If you notice it, discard the case. A faint ring around the circumference of the case in the web section can usually spot it.
Once the trimming is done, we must remember to chamfer the inside of the neck and deburr the outside before going any further. I like to trim a fired case before I have resized it, but we all do it differently.
There are a few different ways to trim your brass. Starting at the cheaper end, we have Lee Precision’s Case Length Gauge and Shell Holder, which allows you to screw a set length gauge for a particular calibre into a cutter and trim to the set length. It’s designed to bottom out on the shell holder when the size is reached. Lee Precision’s other option is the Quick Trim Die, where you place a brass case inside a calibre-specific trim die and then place the die into a standard reloading press. Then, with a handheld cutter, you trim the case down using the trim die to set the length.
Moving up the expense scale, we see lathe-type trimmers appear from most mainstream manufacturers. These hold the case by the case head using a collet, and the cutter is guided by a pilot into the neck, where it starts cutting the neck down. Some of these types of lathes, such as the Forster, can double up as outside neck turners, and most will also handle inside neck chamfering.
As the trimmer's cost increases, so does the range of accessory options, which include micrometer gauges for ease of use when setting custom case lengths. You may use these for trimming your brass to the shortest case in the batch. The micrometre-type attachments help make minute alterations to cut length and aid repeatability when using the trimmer from session to session, as you can note the actual settings on the micrometre. Some of the more custom-grade trimmers, like the LE Wilson, dispense with a collet for holding the case and instead use a case holder. This is a short round bar with a calibre-specific hole in the middle where the patient is placed and tapped home for a tight fit. The case holder is then placed onto two rods on the trimmer bed, and a clamp is employed over the top to hold the complete assembly in place.
Other types of trimmers are the ones that can be used in conjunction with a battery-operated power drill. These have a hex shaft rod on them that the drill bites onto. These usually slip over the top of the case neck and trim the neck down until a built-in stop hits the shoulder and bottoms out the cutter. Slight variations on this type of cutter also allow us to trim, deburr and chamfer the neck simultaneously, all in one operation. As already mentioned, some trimmers will also enable us to neck turn with outside neck turning attachments, and others allow us to use inside neck reamers to remove internal ‘doughnuts’ (this will be covered in more depth in a future issue).
There are pros and cons to all of the above trimmers. Some will only cut to a set length and are less adaptable than others. Some are calibre-specific, so you must get a few different cutters if you shoot a few different calibres. Some are just more expensive than others. Like most tools in the reloading world, it’s a very personal choice as to which one you use, and to a certain extent, the type of shooting and calibre used can determine the type of cutter you might use.
There is no such thing as a lousy trimmer, but some features are more desirable than others – for example, holding the case in a case holder while trimming leaves both hands-free for ease of operation.